Wreaths are one of the simplest items for anyone to make and decorate themselves, making them a perfect crafty project for a winter afternoon.
Some wreath making basics:
- Wreaths begin with a form. This can be styrofoam, straw, wire frame, dried grapevines or willow, or even the lowly wire coat hanger. The easiest places to find forms is your local craft store or thrift store.
- The form is wrapped or covered with a base material. This might be fabric, ribbon, garland, silk or real leaves, anything to disguise the base material and give the wreath some color and substance.
- Layer decorations over the base material, spreading them evenly around the wreath or weighing it more heavily at the base. These are aesthetic decisions that you as the designer make.

Idea #1:Soft and Simple
Savers is the website for several thrift stores that offers some exciting instructions for using materials found in their stores (or in your own closet). They created a charming Festive Felt Wreath (PDF) using several felted (mostly) wool sweaters cut into squares plus some craft wire and scrap ribbon to create a charming, simple wreath.
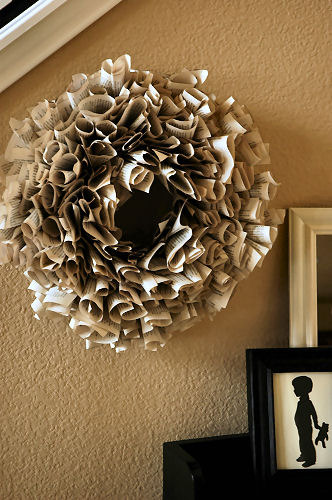
Idea #2: Ruffled, elegant and recycled
This elegant ruffly wreath belies it's humble origin. Lindsay created this from a cheap romance novel after spotting her inspiration (on sale for $40) at a vendor's booth at her citywide garage sale. The wreath is timeless as it stands, but substitute some gold or silver paint for the brown/gray paint Lindsay used to tint the edges and a festive holiday wreath could appear too. Would it be wrong to tear apart a worn copy of Dickens' Christmas Carol for this? (via Dollar Store Crafts).

Idea #3: Christmas Ornaments
A lot more colorful and traditional that either of the previous wreaths, HazelRuth's Christmas Ornament Wreath should only take you a couple hours to complete -after you choose your ornaments. This look could go old-fashioned and colorful as she did or take on a totally different look with a limited color palette. Add meaningful personal ornaments to make it all your own.
Idea #4: Pom Poms. Perfect Kid-Friendly Activity
Somewhere soon you are going to need that one crafty project that will occupy the kids (or the kid in all of us) for an afternoon. Prepare yourself in advance the simple supplies for making this pom-pom wreath, then let the fun begin. Bleubird Vintage provides great photos in her tutorial and includes a pom-pom tutorial to get it started.
Idea #5: Button it Up.
I love buttons. Touching them, sorting them, decorating with them. So of course I'm going to share a project that lets me do all that! Craftapalooza shares her simple tutorial for making these button wreaths. I can see different colorways being used for different season -or something like this white/off-white one filling in year round.
A Bonus Wreath:
Capadia Designs created charming three-dimensional wreath cards using her cricut. Not necessarily wreaths you'd hang on your door or your wall, but framing one of these and setting on a table or giving it as a hostess gift? Love.
How do you craft a great a wreath? Share a link to your favorites in the comments.
(photo credits and copyright remain with the owners of each website).
I also blog at: Weight for Deb and BlogHer on Wednesdays and Saturdays.


No comments:
Post a Comment