I have 2 pair of jeans of that fit me. That's all. Two pair I bought on sale at Ross because my old jeans could not be worn in public anymore without a threat of embarrassing me. When I bought them, I did not spend a lot of time, thought, or cash making the decision beyond the "they fit in the waist and hips" check.
Because I'm still working out, although I'm not at my ideal weight my body is still changing shape. Pants, especially, give me a couple months of wearablility before it's off to the thrift store. This is not the time for $100 perfectly styled jeans, though I hope I'm nearing that "final size" option.
Whatever. The current 2 pair of jeans have been a little less than my ideal. (note, next time spend just a little more than 10 minutes looking for jeans).
First, when did they stop making jeans out of just cotton? Heavy, soft, delish denim seems to have disappeared for me. (OK, maybe I could go a little more upscale than close out stores and find the real thing? I hope?). Everything is part ramie, part cotton and with a bit of stretch.
Second, I want my jeans DARK. Dark, dark, dark. Neither of these pairs were. They were a medium fade that looked as if I'd owned them and worn them for atleast 6 months. While it wasn't an unattractive look, it didn't really make me happy. But Ross had nothing in a dark, dark all denim jean. And I had been about to be arrested for indecent exposure.
Third, after a couple washings, they felt a little too short. There wasn't that subtle break on the shoes that I expect in pants of the proper lenght. Forget completely wearing them with my Danskos. (thank you SusanW for writing that we jeans in two different lengths to go with our shoes!)
So last week I decided to upgrade my jeans just a little.
While I couldn't do a thing about the fiber content, I DO know how to dye fabric and vat dyeing is the easiest thing to do. I already had some navy dye. So I took scissors to hem to give myself more length and treated my jeans to a swim in some deep blue chemically treated water.
The results were not as dark as I might have wished, but they were not unacceptable. The 5% lycra in this fabric was not going to accept any dye, and the ramie and cotton would accept dye at slightly different rates. Still my jeans were now visibly closer to the dark side.
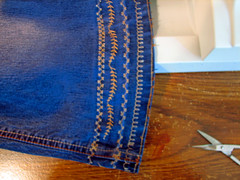
They also had 2 visible lines that showed where the old hem had been: the bottom fold of the leg and the surface stitching line for the old hem.
We are so lucky to be living in a year where embroidery detailing is HOT on jeans. Well, lucky that it's hot and that I have a sewing machine with a number of decorative stitches. I found a thread in a color similar to the decorative stitching on the hip pockets, ran through my menu of decorative stitches and played for just over an hour.
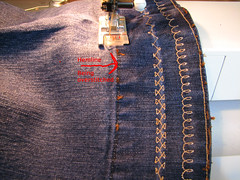
A simple line of straight stitch right along the bottom of the hem firmed the line. Next I chose one of my favorite utility stitches (it's a zig-zag meant for sewing in elastic). My foot has a center-of-stitch mark, which I kept over the faded hem lines. Because the decorative stitch itself moves to both sides it nicely obscures the faded line below. Filling the gap between these lines with more decorative details turned this stitching into a planned part of the design, and stopped the eye/mind from thinking: those stitching lines are hiding something.
If you would like to do something similar to your (or your kid's) pants, I'll share a couple hints:
use more dye than you think if you want it dark, dark. I used the suggest 2 TBS of dye, but I think double this amount would have for a much darker result. (BTW, the top photo is more accurately the final color of the jeans).
use simple decorative stitches with a short repeat when camoflaging "flaws" in the clothes. Let the stitches fool the eye.
if you use a long decorative element (like the leaf in the top image) start and stop it near the inside seam. Leave a small gap rather than trying to fit the elements together.
if your machine does not have fancy stitching, note that this same technique can be done with all straight stitch, or simple zigzags. Varying the stitch length, stitch width (for zigzag) and thread color would all produce fantastic results. More lines of pure straight stitch could make a great statement here.
play with this. Have fun. Remember these are just jeans. One reason to do this is to have fun and use the clothes to express a little of yourself.
I'm Not Alone in Refashioning My Jeans:
Last summer, Katrin at Sew-Mad needed to repair her jeans she ended up "pimping her pants": A colorful bit of backside (which I think emphasizes a very nice backside!) and patched knees!
Sew Funky gave her favorite jeans a bit more life by turning them into capris.
While not jeans, Nikki Shell took some cute yoga pants that didn't fit right and refashioned them into a great pair of spring pants! Nikki, btw, is the hostess of wardrobe refashion!
If refashioning is beyond your jeans, check out Flickr's Denim Surgery group for lots of ideas on reusing, repairing, recycling, revamping your denim.
I also blog at: Deb's Daily Distractions and BlogHer on Mondays and Saturdays.


No comments:
Post a Comment